Saturday, September 29, 2012
Cuddlebug Cuties: Candy Winner & New Martha Stewart Candy
Cuddlebug Cuties: Candy Winner & New Martha Stewart Candy: Hello everyone, I'm sorry to make you all wait all day for the promarker candy winner. We're having pretty icky weather here. Seems like as ...
Sunday, September 23, 2012
Handmade recessed window card
It's another Sunday, schedules has been hectic recently but manage to do the things I like. My practicum in the preschool has started for 2 weeks now & I'm happy with it. Love the children; They're adorable and really make my day. I've to prepare daily lesson plan & learning materials, observe & write a journal about a child's development. It's tough & I'm loving it *-*, I'm still standing strong by the way...I like the school I went to; I'm lucky enough where I've the chance to mix with the special needs children. I don't teach them but it's a great experience to see with own eyes how these children learn to manage themselves & it's a great feeling communicating with them. There was one incident where a boy can't even tie his shoelace (guess he's about 12years); he almost cried, in the end I did it for him. And there's a friendly girl who loves camera; kept asking me to take her picture :)...
In addition; Yesterday I received my result with flying colours; can't believe it...Thank God, my hard works paid off (P/S: Worth the hard earn too :))))).
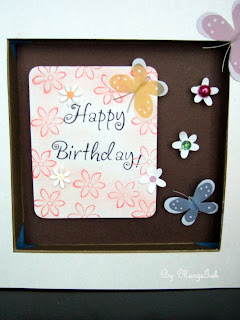
Back to card creation. Well, from my previous post, I had posted about creating own decorative paper. Today I made a recessed window birthday card using one of the paper I designed.
For the card based I used 30cm(L) x 14cm(H) blue card stock. Folded the card stock into 5 with measurement (7x1x14x1x7)cm. The frame size is (14x14)cm. For this card, the frame depth is 1cm.
* You can adjust the frame depth; But please bear in mind the deeper the frame depth the harder it is to store in an envelope & you really have to secure the packaging if you intend to send it by mail.
Glued the frame on the centre of the card stock. I added the decorative paper on outer card & add a small card stock with wording. I also pasted the decorative paper on both left & right of the inner card. On the left I add another small wording with ribbon. I embellished the frame with butterflies & flower stickers & a birthday wishes. I left the other right empty so ones can write own message(s). You can decorate your card with anything. ~Imaginative is creative.~
Sunday, September 16, 2012
Hair clip for the little ones.
Made these hair clips sometimes ago but never had the chance to publish on the blog. Simple & fun to make; Most important one must have a sharp scissors and preferable use hot glue gun. I used fabric glue because it's strong & non-toxic.
Make your own decorative paper.
Sometimes I have difficulty choosing designed paper for card making. I created my own design and printed on an A4 size paper. The latest one is the checkered designed as shown in the picture. Designing own paper has its own benefit where one can save in the softcopy and print whenever needed. Furthermore we are free to choose the type or weight of paper needed; It can also be used as wrapping paper. These designed papers were printed on 100gsm paper.
Saturday, September 15, 2012
I Love My Style!!!: Lin Handmade Greetings Card (September 2012 blog g...
I Love My Style!!!: Lin Handmade Greetings Card (September 2012 blog g...: Come & join LHGC's http://azlina-lin.blogspot.com/2012/09/september-2012-blog-giveaway.html
Handmade Penny Slider Card
While browsing through for a new card ideas I found the 'Penny Slider Card'. It was fun to see on how it works. I couldn't resist but to create one. The first attempt it turns out pretty well; whereby I did it correctly without wasting paper. I used S5127 stamp from Hero Arts (www.heroarts.com). I do not have a round dot foam; I used chads from cardboard to create a rolling wheel (refer bottom pictures).
How I did the wheel? Stack and glue 4 pieces of chads. Once it's dry, glue the chads dot in the center of the penny; repeat on the other penny too. Put aside until it dries up.
(* Other alternative,use the round coiled quilling paper)
Insert the penny wheel into the slot of the card stock so that the card stock slips between the pennies. Ensure the pennies roll back and forth smoothly. Evenly place foam dots along each underside of the card stock. Attach the card onto the other card stock. You may embellish any decoration on top of the penny. I chose the blue flower I made using fringed quilling technique.
How to make rolling wheel from chads?
Monday, September 10, 2012
Anniversary Wishes Tri-fold Card
I decided to make a tri-fold card for her. She's simple; which means too many embellishments won't work for her. I decided to use silver card-stock, few pieces of swarovski crystal, flower shaped stickers, lemon green and moss green cardstock for its centrepiece. I used punches from Kreaxions. Firstly, fold and cut the card before punching the desired area. It is better to fold the card before punching, in order to have an even and neat folding. Finally paste the smaller card-stock as desired. I printed out the wordings on a pearl white card-stock.
Subscribe to:
Comments (Atom)


