Sunday, March 24, 2013

DIY Bi-Colour Rose

Few days ago; I stumbled onto a post by Relaxs Minda about rainbow roses. The colourful flowers looked beautiful. I was tempted; typical of myself always want to try & learn new thing. I went to the florist; bought few stalks of pale yellow roses. Since they don't have white rose; I guess this colour should work. I told the florist I wanted to make colourful flower petals. She then gave some advise on how to make it & told that artificial coloured rose petals will not last longer compared the original. She opened the fridge & took out a bucket of chrysanthemum with the stem submerge in coloured soluble. They use one colour only. She said they use the same process/technique but it took longer days for the petals to be fully covered with the colour. Commercial wise they use special soluble for colouring. At home I found 2 food colouring i.e red and green from my kitchen cabinet. I only have 2 colours so I name this project 'Bi-Colour Rose'. The advantage using food colouring is it is non-poisonous & you can involve children in this project. It is a good science experiment for children too & let them enjoy the process!

The process is pretty easy.
Materials needed:
1)  white rose or pale colour rose (you can try using other types of flower e.g. chrysanthemum, 
     carnation or hydrangea)
     I read from Wikipedia Venezuela Rose is the best whereby it absorbs colours perfectly
2)  containers or cup filled with water
3)  food colouring
4)  scissors or knife to split the stem

Step by step process:
1)  Fill container with water.
2)  Add drops of food colouring (quantity as desired); Stir well.
3)  Use knife or scissors to split end part of the rose's stem
4)  Submerge split stem in different colours

Below are some pictures I took while doing this project. Try it! Enjoy it! Happy weekend.
Pale yellow roses. (6:44 pm; 22/03/2013)
Split stem into two.
Submerge split stem in different colours. (6:45 pm)
8:43 pm (Slightly absorbing the colours)

11:41 pm

Colour fully absorbed.
10:18 am; 23/03/2013
Desk decoration of the day! Bi-coloured roses!
Sharing this on blog hop:
Sew Crafty Angel: Thursday-Sunday Link Party#3
My Turn for us: Co-Host for Wow me Wednesday
Pursuit Of Functional Home : Pin It Monday Hop #3


Friday, March 22, 2013

Hair accessories

So last week I received free sample from WholePort; 10 pieces of wooden strawberry charm beads. Today I decided to make hair accessories and utilise some of the beads. Made it for my niece for her coming birthday in April. Still a month before she turns 6 but I wanted to give her many handmade items, which mean I have to start from now. I'm sure she'll be excited about it. This the first item I made for her. A pair of hair clip & a ponytail holder. I used same pattern for ribbons; Embellished hair clip with red strawberry beads whereas the ponytail holder I added pink bead. Here are few pictures of the accessories. Have a pleasant day!
Hair Accessories....Checked! :))
Coming soon...... ???

Participating & posted this post at Sew Crafty Angel: Thursday Link Party

Ponytail Holder with pink strawberry bead.

Ponytail Holder from the back

Hair clip.


Sunday, March 17, 2013

Coloured homemade paper

Today after tidying up craft corner I decided to make homemade paper. Good weather for a fun activity. Earlier I had posted the technique of making paper from home. This time I would like to share with you how I make coloured paper. Try it & have fun! Enjoy the pictures!

Last week I got this orange roses for free from my favourite florist.
I always receive extra flowers every time I go to the shop. Lucky me!!!
I should consider working part-time & take the opportunity to learn flower arrangement ;p
I use these petals for this project.
I need used white paper. Tear into pieces.
I need small amount of coloured paper. I chose orange & red.
Dried rose petals.
Put the pieces of paper into the blender.
Pour water. Blend it!
Add coloured paper.
The amount of coloured paper I used. Blend it!
Look at the colour. It's pink!
Looked like strawberry smoothies!
Thought of doing something different!
Added orange peeled. Blend.
Add dried rose petals. Blend for a while. I want the effect on the paper.
In the other hand, prepare water in a basin. Add liquid starch.
Stir well. Pour blended paper.
Stir the mixture.
Use strainer to scoop out the mixture. Drain! Leave until no more dripping water.
Turn strainer backward to detach paper.
I can't wait; I used iron to half dry it.
You can use sponge to absorb excess water.
Personally I don't like using sponge.
Dry it under the sun.
Manage to produce 8 sheets of coloured homemade paper.
Ready to be used.

Look closely! Can you see the orange peeled?

Saturday, March 16, 2013

Recycle CD Spindle

It is Saturday, time to tidy up my crafting corner. Yes! I have to do it; craft supplies laying everywhere & it's kind of messy. Found few empty CD spindles! Instead of throwing; I recycled. I converted them to a ribbon holder. A neat way to organise your ribbons. When not in use; you can stack up the spindles to safe storage space. The cover is just perfect to protect your ribbons from accumulating dust. You can decorate the cover but I leave as it is so I can see the ribbons.
Another way of recycling the empty spindle; I turned them as an accessories organiser. Used the spindle to hang accessories. I used  double sided tape to stick the base on the wall. I would like to share few photos on how I organise things. Have a good weekend!


Thursday, March 14, 2013

Free sample from Wholeport

Checked my mail box today! Finally!!! Something I have been looking forward has arrived. I received free wood beads sample from Wholeport a company based in Beijing. Do check their website. They have plenty of things to offer at reasonable price; baking supplies, fabrics, laces, crafting papers and many more. You can also join their weekly free sample give away. All you need to do register yourself, become a member & there you go. What I like about this site? You can purchase their item at minimum quantity; need not worry to purchase in bulk. Now all I need to do is to utilise these lovely beads! Till then, happy crafting, ciao!!!


Tuesday, March 12, 2013

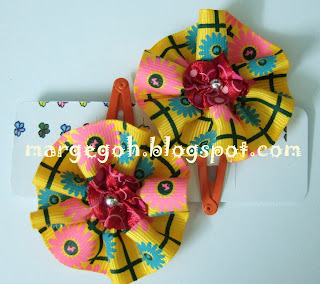
Rosette Ribbon Hair Clip

I always love crafting; as far I can remember I start holding a needle before I start schooling. And I remember mama will scold me, 'It's dangerous, you will hurt yourself!' a word I clearly remember. I like sewing, I like crafting (all sort of crafts; nothing specific as long I enjoy doing it) & will always do. I enjoy watching my grandmother sewing her dress using her antique manual sewing machine. And I remember how much I love attending 'Kelas Jahitan' (Sewing Class) during primary school. My first cross-stitch experience when I was 9; I made my first tote bag & apron when I was 10, by 12 years old I can handle the manual sewing machine. How I miss those days!!!
Well, over the weekend, I made few rosettes using ribbon (earlier I've done rosettes using paper). The technique was simple & very easy to make; most of all you don't need to own a sewing machine. What you need? Ribbons, needle, thread & scissors. Start by straight stitch at the edge of a ribbon. Once you reach the end pull the thread to gather & arrange the ribbon in a circle so that it resembles a rose. Tie the thread to secure then stitch to join the ribbon. I used two sizes of ribbon as seen on the picture. Same technique applies for the smaller ribbon. I apply a silver round bead on top of the red ribbon. You can use any type of embellishment. Once done, stitch the smaller rosette on top of the yellow ribbon. Alternatively, you can use glue to assemble them. Rosette is fun to make & can be apply on any crafts such as cards, scrapbook, bags, shoes etc......
I am making children's hair clip so I apply glue using hot glue gun to stick the rosette ribbon on hair clip. The hair clip is meant for Amaira, Kishley's beautiful little girl.

Straight stitch at the edge of ribbon.
Pull the thread to arrange the ribbon in a circle. Tie to secure & stitch the remain.

Attach smaller rosette by stitching or use fabric glue. The silver bead comes with hole so I stitch on the smaller rosette. If you are using non-hole beads you can glue it.
A pair of finished product.
Ready to be flown to UK!
Made in Malaysia with love!

Sunday, March 10, 2013

Liebster Blog Award

Wow!!! Thank you Titic Dulu from Croatia for this award! So sweet of you! Do pay a visit & join   DuiT Handmade; Enjoy her unique creations!


And here is a little about what the award is all about:

This award was designed to be a blog award in the "pay it forward" fashion. Once you've been nominated, you award it to five blogs that you like that have fewer than 200 followers, to encourage new visitors to visit these blogs.

The rules for accepting this award are:

You need to thank the person who gave you the award and link back to their blog. Post the award onto your blog. Give the award to five bloggers who you appreciate that have fewer than 200 followers. Leave a comment on their blog letting them know that you have given them this awesome award!

Next you need to PAY IT FORWARD!

Award goes to:


Friday, March 8, 2013

Homemade paper

I have been searching used blender high and low; been asking around but unfortunately none. Friends were wondering my obsession on the second hand blender. I can just purchase a new one; but why should I waste. I need it for my craft project. Last week I happened to be in a shop selling second hand items & to my excitement I found one at a very reasonable price. Without hesitation nor thinking twice, I grabbed it. Finally, after a long wait I got it *=*.... Rushed home, unpacked my "baby", prepared all the necessary then there you go.... Let the project begin.....hahhaaaaha. I would like to share some photos how I make my own homemade paper using used paper. In fact you can use any type of paper, envelope, boxes or tissue. So far I only use 80gsm paper. The process was easy and only took me an hour to produce 9 round sheets of paper. You can make you own too. Try it & enjoy!!!!

RM39.50 only!!!!!!
Working great!!!!


Used 7 sheets of A4 paper; tore into small pieces.

Added 3/4 water.
This is how the ground paper look like.
The texture was smoother compare my 1st experiment without using blender.
I added some dry leaves too (optional).
Prepare clean water.

Corn starch.
If you intend to write on  the paper mix some liquid starch into water.

Liquid starch.

Pour liquid starch onto the filled basin. Stir. Pour ground paper.
Dip the strainer into the water.
I don't own a square frame; alternatively I use round strainer.


Scoop the residue. Drain it.
You can use sponge to absorb the remaining water.
In my case I let the water drain completely; turn the strainer & gently tap the screen to detach the paper.
Let it dry in room temperature or under the hot sun. You can use iron too but ensure to cover with cloth before ironing.
It was not completely dry so I left it dry overnight.

Produced sheets of paper.
I use net to get this texture.
Press with hot iron & leave overnight.
Remove the net when it dries.

Writing on my own home-made recycled paper!!!

Linkwithin

Related Posts Plugin for WordPress, Blogger...